How to Play the Acoustic Guitar
Here are the basics and chords you will need to learn if you want o know how to play the acoustic guitar. Start from the beginning and then slowly move onto chords and eventually on to the easy acoustic guitar songs.
Acoustic Guitar Basics:
#1: Types of Acoustic Guitar
#2: Parts of an Acoustic Guitar
#3: Notes on the guitar
#4: Tuning your guitar
#5: Styles of picking
#6: The Slide
#7: The Hammer On
#8: The Pull-Off
#9: The Bend
Acoustic Guitar Chords (Major):
Open Chords
The C Major Chord
The E Major Chord
The A Major Chord
The G Major Chord
The D Major Chord
Acoustic Guitar Chords (Minor):
The E Minor Chord
The A Minor Chord
The D Minor Chord
Learning to play the Acoustic Guitar
On this site you will find free basic guitar lessons, chords and easy acoustic songs to help you learn the acoustic guitar. I started up this blog in September 2008 because after learning the acoustic guitar and playing it for two years I wanted to write some of the basics and help others learn the acoustic guitar like I did. I do have to mention that after being taught some of the absolute basics, I actually learned to play the guitar entirely from lessons online and a great course that I bough.
If you are new to the guitar then I suggest first that you learn the basics, like the parts of the guitar and then move onto to basic techniques like the hammer-on and pull off etc. Once you learn all the open chords and can play them and switch between them easily then you can try out some easy guitar songs. Learning the guitar is hard work but once you have its absolutely fantastic. I hope you find the information on this site useful and as time goes on Ill be adding more lessons and more songs to help you learn acoustic guitar.
learning the acoustic guitar
Once you have seen and understood the basics that i have on this site and you really want to take it a step further then i recommend you work your way up to the intermediate and advanced lessons through a structured course. You can try the one i used which took me from a scratchy player getting confused and frustrated with all the “free” advanced lessons out there. You can check out the Jamorama review i wrote and see if that program works out for you.
The Bend
The bend is the most versatile and useful technique available to guitarists. Very few instruments have the luxury of being able to bend notes. Pianos, trumpets, and saxophones cannot easily bend notes. As my guitar teacher said, “Because guitarists can bend notes, it means they have to bend notes!” The bend is the most complicated introductory technique, because it takes the most practice and coordination to execute correctly, and because there are many types, but with practice it should be easy. Bends are indicated in tab notation as follows:
                                prebend
    1/2     1         1/2       1/2
   +   +   +   +     +   +   +   +
e:-----------------|------------------|
B:-7^~~~---7^~~~---|-7^~~r------^7~~r-|
G:-----------------|------------------|
D:-----------------|------------------|
A:-----------------|------------------|
E:-----------------|------------------|
The first bend is a bend of 1/2 step on the second string 7th fret.
The second bend is a bend of 1 step on the second string 7th fret.
The third bend is a bend-and-release of 1/2 step on the second string 7th fret.
The fourth bend is a prebend of 1/2 step on the second string 7th fret, with a release.
The Basic Bend
The first bend shown in the above figure is accomplished by fretting the second string 7th fret (usually with your ring finger), picking the note, and actually pushing the string sideways to bend it. Keep the string pressed firmly against the fret, and make sure you keep your finger on the same fret (don’t slide up or down to a different fret). When the pitch of the string increases by one half step, you have correctly executed this bend. To play the second bend, use the same technique, but bend the string until the pitch increases by one step. The most important part of the bend is making sure you bend to the exact pitch. If you don’t, it will sound awful. It is usually easiest if you fret with your ring finger, but your index and middle fingers can be used as well. This will come with practice.
The Bend-and-Release
The third bend shown in the above figure is a bend-and-release. This is accomplished in the same fashion as a normal bend, but when the release in indicated, you gently release the string and allow it to go back down to the original pitch. Remember to keep the string pressed firmly against the fret while you are doing this.
The Prebend
The fourth bend shown in the above figure is a prebend. This is accomplished a fashion similar to a normal bend. However, instead of picking the note and then bending the string, you bend the string and then pick the note. Prebends are almost always followed by a release, as is shown in the figure. This gives an interesting sound: a note which starts high and bends down as opposed to a normal bend where the note starts low and bends up.
That’s about it for the bend. As you have seen, there are many types of bends and all appear in many different kinds of music. The prebend is the least used, so you don’t need to master it yet, but the others are very useful. And remember, the guitar is blessed by bends, so use them! Keep playin!
Hammer On
The hammer-on is one of the most widely used techniques for soloing. It is very simple and can be applied in many different ways to many different situations. A hammer-on is indicated in tab notation by this symbol:
   +   +
e:---------|
B:-----5h7-|
G:---------|
D:-4h6-----|
A:---------|
E:---------|
The first hammer-on is played on the 4th string from the 4th fret to the 6th fret.
The second hammer-on is played on the 2nd string from the 5th fret to the 7th fret.
The hammer-on’s shown above are accomplished by fretting the desired note with your index finger, picking the note, then hammering your ring finger down onto the desired higher fret. Make sure you keep the index finger down until slightly after you fret the higher note. This is the most important part of the hammer-on: making sure your index finger isn’t moved before you place your ring finger on the higher note. You can also hammer-on with different fingers, and you can work on this as you get better at them.
+ +
e:---------|
B:---------|
G:-----7h9-|
D:-7h8-----|
A:---------|
E:---------|
For the first, use your index finger to fret the fourth string 7th fret, and your middle finger to hammer-on the 8th fret. For the second, simply move your index finger up a string to the third string 7th fret, and hammer-on with your ring finger.
That’s about it for the hammer-on. They are easy to perform, but do take some practice. The hardest parts are making sure you hold down your index finger until after you fret the higher note with your ring finger. Make sure you try hammering with other fingers, because this versatility is required when performing complex solos later. Good luck with this new technique!
The Pull-Off
The pull-off is one of the most widely used techniques for soloing. It is very simple and can be applied in many different ways to many different situations. It is the exact opposite of the hammer-on, but requires a slight modification of technique. A pull-off is indicated in tab notation by this symbol:
   +   +
e:---------|
B:-----6p4-|
G:---------|
D:-7p5-----|
A:---------|
E:---------|
The first pull-off is played on the 4th string from the 7th fret to the 5th fret.
The second pull-off is played on the 2nd string from the 6th fret to the 4th fret.
The pull-off’s shown above are accomplished by fretting both notes: the higher note with your ring finger and the lower note with your index finger. You then pick the note (and the higher note should sound), and release your ring finger quickly. The string should sound on the lower note after you have released the top finger. This is the most important part of the pull-off: making sure you fret both notes initially, and then making sure that you pull-off quickly enough that the lower note still sounds. You can also pull-off with different fingers, and you can work on this as you get better at them.
Other fingers can be used in the pull-off. Let’s try to play this example:
   +   +
e:---------|
B:---------|
G:-8p7-----|
D:-----9p7-|
A:---------|
E:---------|
For the first, use your index finger to fret the third string 7th fret, and your middle finger to pull-off the 8th fret. For the second, simply move your index finger down a string to the fourth string 7th fret, and pull-off with your ring finger.
That’s about it for the pull-off. They are easy to perform, but do take some practice. The hardest parts are making sure you fret both fingers and that you pull-off quickly enough so that the lower note still sounds. Make sure you try pulling off with other fingers, because this versatility is required when performing complex solos later. Good luck with this new technique!
The Slide
The slide is the simplest technique for a beginning guitarist to learn. It gets its name from the technique: you actually slide your finger up or down the fretboard while fretting a string. A slide is represented in tab notation by this symbol:
+   +
e:---------|
B:-----6\5-|
G:---------|
D:-5/7-----|
A:---------|
E:---------|
The first slide is a slide on the 4th string from the 5th fret up to the 7th fret.
The second slide is a slide on the 2nd string from the 6th fret down to the 5th fret.
The slide is accomplished by fretting the desired note, picking the note, then moving your finger up to the desired higher note. Make sure you maintain pressure on the string as you slide, so the string is not muted. This is the most important part of the slide: making sure the string stays against the fretboard while you slide. You can also slide down, using the same technique but moving down the fretboard to a lower note.
And so had ended your first beginners guitar lessons.
Styles of picking
There are two schools of acoustic guitar picking that have developed over time: the flatpickers, who use the small plastic picks; and the fingerpickers, who just use their fingers without a pick. I fall into the latter category, because I find fingerpicking to be much more liberating than using a pick, it feels better and its much easier to get the hang of.
You may also hear of a technique called “fingerstyle,” which is very similar to fingerpicking. Basically, fingerpicking is defined as playing only one string at a time, while fingerstyle players sometimes play two- or three-note chords using their fingers. However, the distinction between these two styles is rather worthless because most guitarists, including Jimmy Page, Eric Clapton, James Taylor, John Denver, Jim Croce play both styles at different times or even during the same song.
Most players use both styles, flatpicking and fingerpicking, at different times. Both have advantages and disadvantages depending on what sound you want to get, so it is all up to you. Even if you don’t fingerpick much, it is very helpful to know how to do it in case the need ever arises.
Tuning your Acoustic Guitar
Tuning may be the most important thing when learning to play an Acoustic Guitar. If you aren’t in tune, you will never sound good, no matter how incredible a player you are, everything and absolutely everything sounds like garbage. These pages are designed to teach you how to tune your guitar. Follow them step-by-step and you will be able to tune quickly and easily, without the need for an expensive electronic tuner.
The goal of tuning is to put your strings in tune with each other. You strings should be tuned to the following notes (low-to-high): EADGBE. This is called “standard tuning.” There are many other possible tunings, but I will not discuss those here.
The first step in tuning is to get a reference pitch. This will be the E on your sixth string. The accuracy of your tuning to this pitch when playing alone is relatively unimportant; I tend to tune to a pitch slightly below this to help me sing higher notes more easily. However, if you are playing in a group, it is absolutely imperative that you all tune to the same reference pitch, because if you don’t you will all be out of tune with each other.
The sound file below is an E on your sixth string. Tune your sixth string to it before you go on. To do this, play the pitch, then tune your 6th string until the pitch sounds exactly like the file. You may have to turn up your speaker volume to be able to hear the file well enough to tune.
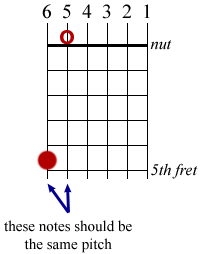
Once you have tuned your sixth string to E, you can tune your fifth string to A based on your sixth string. Refer to the image below as you do this. It’s very simple, and the hardest part will be making sure that the open fifth string pitch sounds EXACTLY like the fretted sixth string. The procedure goes like this:
- Fret your sixth string at the 5th fret.
- Tune your open fifth string until it sounds exactly like the fretted sixth string.
Why does this work? Well, the sixth string 5th fret is an A, which is the same note as your open fifth string. Once you’re done, move on to the fourth string.
Tuning Your Fourth String
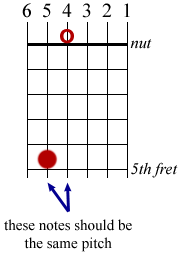
Once you have tuned your fifth string to A, you can tune your fourth string to D based on your fifth string. The procedure is exactly the same, but we’ve moved up a string:
- Fret your fifth string at the 5th fret.
- Tune your open fourth string until it sounds exactly like the fretted fifth string.
Why does this work? Well, the fifth string 5th fret is a D, which is the same note as your open fourth string. Once you’re done, move on to the third string.
Tuning Your Third String
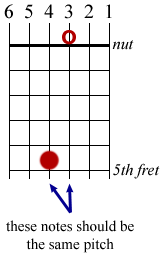
Once you have tuned your fourth string to D, you can tune your third string to G based on your fourth string. The procedure is exactly the same, but we’ve moved up another string:
- Fret your fourth string at the 5th fret.
- Tune your open third string until it sounds exactly like the fretted fourth string.
Why does this work? Well, the fourth string 5th fret is a G, which is the same note as your open third string. Once you’re done, move on to the second string.
Tuning Your Second String
Once you have tuned your third string to G, you can tune your second string to B based on your third string. The procedure is similar, but this time we use the fourth fret instead of the fifth:
- Fret your third string at the 4th fret.
- Tune your open second string until it sounds exactly like the fretted third string.
Why does this work? Well, the third string 4th fret is a B, which is the same note as your open second string. Once you’re done, move on to the first string.
Tuning Your First String
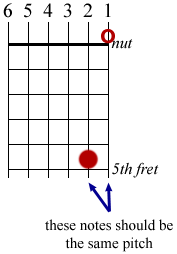
Once you have tuned your second string to B, you can tune your first string to E based on your second string. We now return to fretting at the fifth fret:
- Fret your second string at the 5th fret.
- Tune your open first string until it sounds exactly like the fretted second string.
Why does this work? Well, the second string 5th fret is an E, which is the same note as your open first string.
You have now tuned your guitar! You may have to go back and slightly re tune certain strings to sound exactly right, but this will usually get you close enough. Just make sure you are as accurate as possible when tuning. Good luck, and if you have any questions, please let me know.
The notes on a guitar
The image that you see below is the fretboard of an Acoustic Guitar and the notes that each fret represent, now while this might seem a bit of a jumble now it will all make some sense soon but i put this image up so you can use it for reference later.
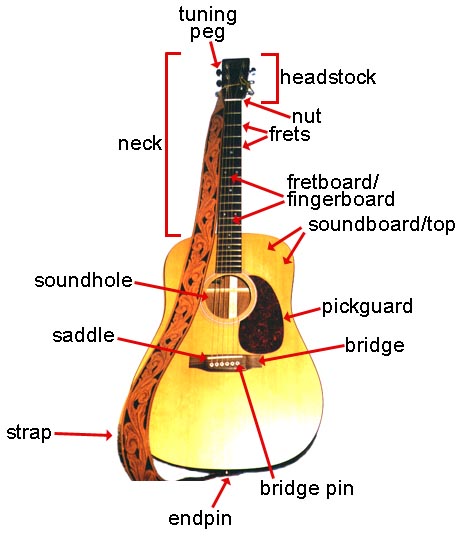
The parts of an Acoustic Guitar
These are the parts of an Acoustic Guitar, i know this might be the boring part of learning to play an Acoustic Guitar but if knowing the parts will help you later when i and other people will refer to them.
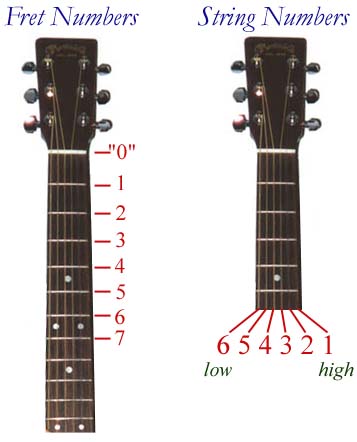
The image below shows the names of the frets and strings
The strings are numbered 1 through 6, with 6 being the lowest (thickest) string. The frets are numbered from 0, with higher numbers referring to higher pitches.


